Printing, Part Four
Or everything I've learned about getting consistent color with Photoshop, a PowerBook G4, and an Epson R1800.
(See also: part one, part two, and part three.)
The Print
If you are following me this far, you have bought a printer and some papaer, and have soft-proofed an image. Now resize your image to match your paper size. The print dialog will also allow you to change the image size, but you'll have more control if you use the resize function. When resizing, pay attention to the resolution. When resizing for a final print, make sure you can resize to at least 240 DPI. 360 DPI is even better.
Photoshop has about five print options. Choose the "Print with Preview..." item. This dialog allows you to check most of the settings that influence color reproduction.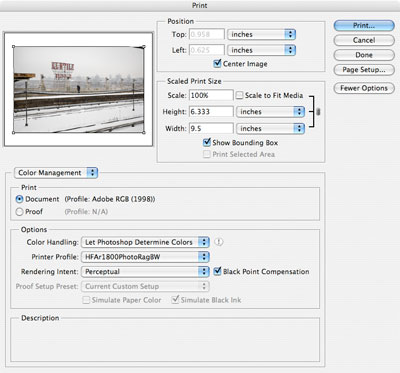
This is also where things get a little OS X and Epson specific. From the "Print with Preview" dialog, click the "Print Preview" button. Make sure your printer is the one selected. Also verify the paper size. This is also where you'll specify whether your are using the standard sheet feeder, the manual feed, or roll paper. If the wrong printer is selected, you'll have difficulty positioning the image accurately on paper. If the wrong paper size is selected, you'll have trouble using the manual feed.
Once you have checked your printer and paper size, close the "Print Preview" dialog. Make sure the "Color Management" menu item is selected. Then verify that the "Document" radio button is selected -- you want to make a final print, not proof the image as it would appear on another device. Select "Let Photoshop Determine Colors" in the "Color Handling" menu. Select your printer's profile in the "Printer Profile" menu. Select the same rendering intent you selected in the soft proof dialog in the "Rendering Intent" menu. If you proofed with black point compensation, verify that it is selected. This is all fairly mechanical, but important.
Verify the positioning of your image on the printed page, then click the "Print..." button.
The standard print dialog should appear. Navigate to the "Print Setting" panel.
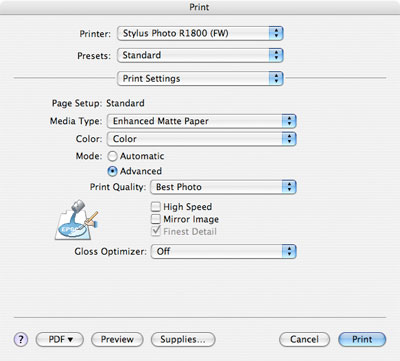
Verify that your paper is selected in the "Media Type." If your paper type isn't visible, you may have selected the wrong paper size in the "Page Setup" menu, or you might be using a paper not directly by your printer vendor. If your paper isn't listed, the paper manufacturer should have supplied information about the closest choice. For example, on my printer, Hahnemuhle Photo Rag should be printed with the "Velvet Fine Art" media type.
You may also choose to customize the print quality on this panel. On the Epson 1800, the difference between "Photo" and "Best Photo" is surprisingly small.
Important: the "Print Quality" setting should match the paper profile and type you are using. For example, the "Photo RPM" setting, intended for glossy paper, should not be used with a matte paper. If you proofed the print using a "Best Photo" profile, choose a "Photo" quality setting. Whew.
Next, navigate to the "Color Management" panel. Make sure that the "Off (No Color Adjustment) radio button is selected. This very important step ensures that the print driver won't try to adjust color in your image.
And that should be it. Make the print.
Once the print is done, give it a few minutes to dry. Then take a tip from the wet darkroom and write your print settings in pencil on the back of the print. Note the paper used, additional adjustments made during proofing, rendering intent, and media type settings. You'll likely make a number of prints and will want to compare them side by side. Writing the settings on the back helps you keep track of the differences.
Just to be safe, give your final prints lots of time to dry. They are safe to handle soon after printing, but let them dry for 24 hours before placing other prints on top of them or otherwise touching the print surface. The print surface is somewhat fragile and can scratch when wet.
posted by Eric Hancock at
12:32 AM
![]()
![]()

0 Comments:
Post a Comment
<< Home